SFTP
This plugins uses the extends CodeLite functionality to provide remote access to remote machines.
When this plugin is enabled, you get a new tab in the workspace view named SFTP which provides an Explorer
like view to a remote file system on a remote machine.
To browse the remote machine file system you first need to define an SSH account.
Installing SSH Tools on Windows
On Windows 10 and later, install OpenSSH tools as described here
Uploading keys to remote machines
To generate a public key which allows you to access a remote machine without typing a password, run this from a terminal
and follow the instructions (usually clicking ENTER do the trick):
ssh-keygen -t rsa -C "YOUR@EMAIL.COM"
The above will generate 2 files for you:
~/.ssh/id_rsa
~/.ssh/id_rsa.pub
Tip
Under Windows, these files are placed under %USERPROFILE%\.ssh
Copy the content of the file id_rsa.pub and append it to the file ~/.ssh/authorized_keys on the remote machine
A one liner to do this
- Open a terminal and ssh into the remote machine
- Type this from the terminal (replacing
id_rsa.pub content goes herewith the actual content):
echo "id_rsa.pub content goes here" >> ~/.ssh/authorized_keys
SSH accounts
Now that you have created a key to access to the remote machine, its time to define an account in CodeLite.
From the main menu bar, open the account manager dialog:
Plugins->SFTP->Open SSH account manager- Click on the
Addbutton - Fill the following fields:
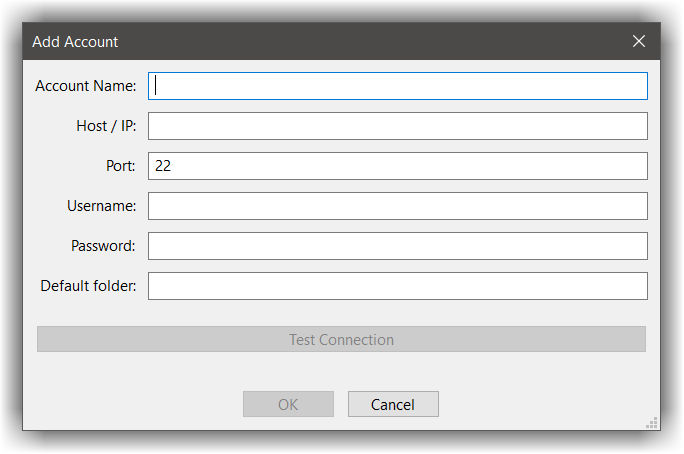
| Field name | Description | Mandatory |
|---|---|---|
| Account Name | Give the account a meaningful name | ✓ |
| Host / IP | Remote machine IP or DNS | ✓ |
| Port | SSH server port, most ssh servers are accepting connections on port 22 |
|
| Username | Login user name on the remote machine | ✓ |
| Password | When login using password based access, this will be the password | |
| Default folder | Set a default folder for the account |
- Finally, click the
Test connectionbutton to test your account
The SFTP Explorer view
In addition for defining new SSH accounts in CodeLite, the SFTP plugin offers a tree view to a remote machine
- In the workspace pane, select the
SFTPtab (if its not there, you can check under theHidden tabsmenu) - Click on the
Connecttool button

- In the dialog that shown:
- Check the option
connect to an existing account - Select the account from the drop down list
- Check the option
You should now be able to browse files on the remote machine
Sync Folder with Remote
Since CodeLite 19.0.0
You can upload the files of a local folder to a remote machine in one step:
- In a folder view (for example the
File Explorertab), right-click a folder and selectSync Folder with Remote - In the dialog that opens:
- Choose the target account
- Enter the remote folder, or click the
Browse...button to choose it from the remote machine - In the file list, uncheck the files that you do not want to upload. Use the
Select AllandUnselect Allbuttons on the right of the list, or press Space to check or uncheck the selected file - To find files quickly, type in the filter field above the list. Only the file names that contain the text are displayed (the search is not case sensitive). For example, type
.cppto display only the.cppfiles
- Click
OK
Notes:
- Only the files that are directly inside the folder are listed. Nested folders are not included. If the folder has no files, CodeLite shows a
Nothing to Syncmessage. - When a filter is used, only the files that are displayed (and checked) are uploaded.
Select AllandUnselect Allalso change only the displayed files. - Existing files on the remote machine are overwritten. Nothing is deleted on the remote machine.
- If the remote folder does not exist, it is created, including its missing parent folders (like
mkdir -p). - CodeLite remembers the account and the remote folder that you entered, and fills them in next time.
- In a File System Workspace that has a remote folder and an SSH account (the
Remotepage of the workspace settings, with remote enabled), the dialog is already filled for you. The remote folder is<remote workspace folder>/<selected folder, relative to the workspace root>. For example, if the workspace root is/home/me/project, the remote workspace folder is/srv/project, and you sync/home/me/project/src/ui, the remote folder is/srv/project/src/ui. You can still change it. If remote development is disabled for the workspace, or no remote folder is set, theRemote folderfield is left empty. - When the sync starts, the
SFTP Logview opens and shows the progress. It does not block the rest of the IDE. ClickCancelto stop. The file that is being uploaded is not interrupted, but the next files are skipped.